If you have vinyl siding on your home and you are planning to replace your windows, you have likely come across the term “j-channel” without much explanation of what it actually does. This small trim piece plays a big role in how your windows perform, how they look, and how well your home stays protected from water and drafts.
Below is a detailed breakdown of everything you need to know about windows with j-channel, written in simple terms so you can make confident decisions.
Understanding J-Channel and Its Role in Window Installation
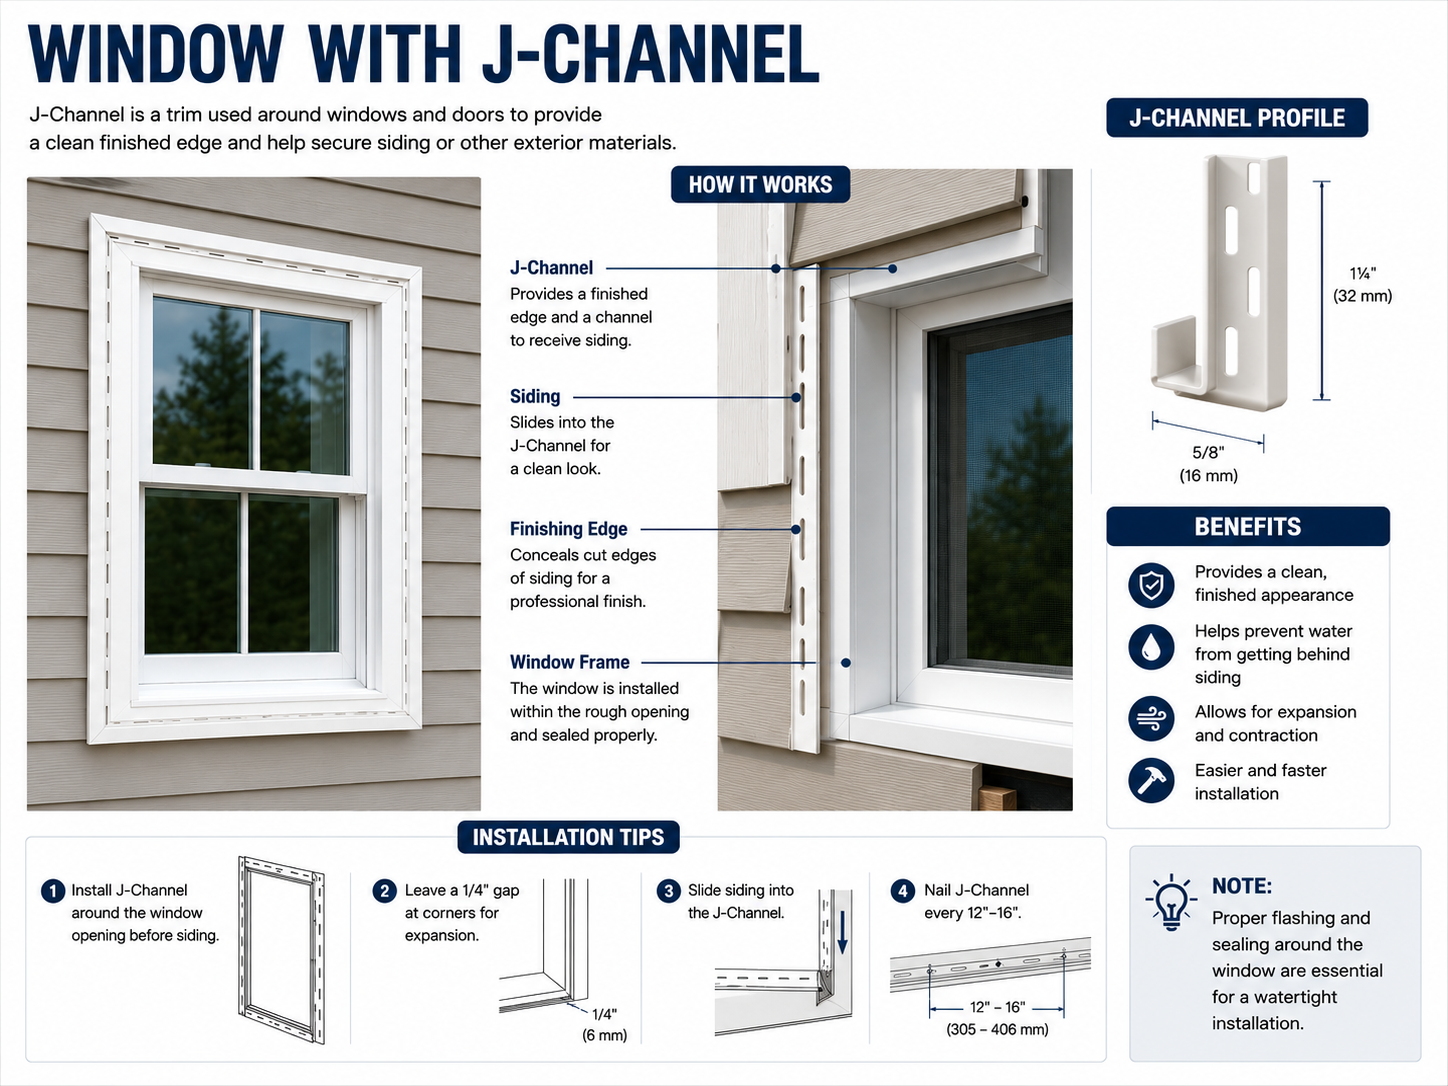
J-channel is a vinyl trim component shaped like the letter “J” that wraps around the edges of windows and doors where they meet vinyl siding. It serves both a practical and a visual purpose, and it has become a standard part of most modern window installations.
What Exactly Is J-Channel
J-channel is a thin strip of vinyl that creates a neat border where siding panels end near a window or door frame. The siding slides into the open part of the “J” shape, giving a clean, finished appearance.
At the same time, this design helps guide rainwater away from the window opening instead of letting it pool or seep behind the siding.
Why It Matters for Vinyl Siding Homes
Vinyl siding expands and contracts with temperature changes throughout the year, especially in climates with hot summers and cold winters. J-channel gives the siding room to move without pulling away from the window frame or creating gaps.
Without it, siding edges near windows can look uneven, loose, or poorly finished over time.
Why Many Newer Homes Come With Built-In J-Channel
Home construction has changed significantly over the past few decades, and window manufacturers have adapted their designs to match these changes. This shift explains why so many newer homes already have j-channel built directly into the window frames.
The Shift Toward Vinyl Siding
Vinyl siding became popular because it requires very little upkeep, holds up well against weather, and is more affordable than materials like wood or brick.
As vinyl siding became the standard choice for new construction, builders needed a reliable way to seal the gap between siding and window frames, which is where j-channel became essential.
Built-In J-Channel on Modern Windows
Many windows manufactured in the last two decades come with j-channel already attached as part of the frame. This makes installation faster during new home construction because the siding simply slides into the channel.
However, during a window replacement project, this built-in feature can sometimes complicate things if the new window has a different profile than the old one.
What This Means If You Live in an Older Vinyl-Sided Home
If your home was built or sided within the last twenty to twenty-five years, there is a strong chance your existing windows already have integrated j-channel.
Knowing this ahead of time helps you and your contractor plan for a smoother replacement, since the new windows will likely need to match this setup to avoid extra siding work.
How J-Channel Helps Protect Your Home From Water and Drafts
Beyond giving your home a tidy appearance, j-channel plays an important protective role. It is designed to work almost like a small drainage system around your windows.
Directing Water Away From Window Openings
When rain runs down your siding, j-channel helps guide that water around the window rather than letting it collect at the corners or edges. This reduces the chances of water finding its way behind the siding and into the wall cavity, where it could cause hidden damage over time.
Reducing the Risk of Mold and Insect Problems
Moisture that gets trapped behind siding or inside wall cavities creates the perfect environment for mold growth and can also attract insects looking for damp wood.
Properly installed j-channel reduces this risk significantly by keeping water on the outside of the wall system where it belongs.
J-Channel Versus Traditional Window Trim
Older homes, particularly those with wood siding or aluminum exteriors, often use traditional trim methods instead of j-channel. Comparing the two helps explain why j-channel has become the preferred option for vinyl-sided homes.
How Traditional Trim Works
Traditional window trim typically involves wood casing or aluminum flashing installed around the window opening, with caulking used to seal gaps. While this method can work well, it depends heavily on regular maintenance such as repainting and resealing to stay effective over the years.
Comparing the Two Side by Side
The table below highlights the main differences between j-channel and traditional trim methods, which can help you understand why one might be recommended over the other depending on your siding type.
| Feature | J-Channel | Traditional Trim |
| Moisture Protection | Strong, channels water away automatically | Depends on caulking and sealing quality |
| Maintenance Needs | Very low | Requires periodic painting or resealing |
| Compatibility | Best with vinyl siding | Common with wood, brick, or aluminum |
| Appearance Options | Several color choices to match siding | Limited to paint colors and trim styles |
| Movement Accommodation | Allows siding to expand and contract | Less flexible with material movement |
Determining Whether Your Home Needs J-Channel
Not every home requires j-channel, and knowing whether yours does can save you time and confusion when discussing options with a contractor.
Siding Type Determines the Need
Homes finished entirely in vinyl siding will almost always have j-channel around windows and doors as a standard part of the installation. On the other hand, homes with brick exteriors generally do not need it, since brick does not require the same type of trim transition that vinyl does.
Mixed Siding Situations
Some homes combine materials, such as brick on the lower level and vinyl siding on the upper floors. In these cases, any window located in a vinyl-sided section will typically use j-channel, while windows surrounded by brick will not.
Wood and aluminum siding fall somewhere in between, often benefiting from at least a small amount of j-channel at the top of the window even if it is not strictly required everywhere.
Risks of Installing Windows Without Proper J-Channel
When a window installation skips or mishandles j-channel, the consequences are not always obvious right away. Problems often develop slowly and become more expensive the longer they go unnoticed.
Hidden Moisture Damage
Water that sneaks behind siding due to missing or poorly fitted j-channel can soak into wall sheathing and framing materials. Over months or years, this can lead to wood rot, weakened structural components, and costly repairs that go far beyond the cost of the window itself.
Higher Energy Bills
Gaps around windows caused by improper trim work allow conditioned air to escape and outside air to enter. This forces heating and cooling systems to work harder, which can show up as noticeably higher utility bills, especially during extreme weather months.
Shortened Lifespan of Siding and Windows
When moisture repeatedly gets trapped near window edges, both the siding and the window frame can deteriorate faster than expected. What should be a long-lasting installation can end up needing repairs or replacement much sooner than the manufacturer’s warranty would suggest.
Spotting Signs That J-Channel Has Failed
Catching j-channel problems early can prevent small issues from turning into major repair projects. There are several warning signs homeowners can watch for around their windows and siding.
Visual Clues on the Outside
Streaks or discoloration on the siding directly below a window often indicate that water is escaping from behind the trim rather than draining properly down the surface. Loose, warped, or gapping trim pieces are another visible sign that something is not sealed correctly.
Indoor Warning Signs
Drafts felt near the edges of a window, especially on windy days, often point to gaps in the seal around the frame. Mold, mildew, or a musty smell near interior window frames can also signal that moisture is getting trapped somewhere it should not be.
How Homeowners Can Inspect Their Own Windows and Siding
A basic inspection does not require special tools and can be done in a short amount of time. The steps below offer a simple checklist anyone can follow.
- Walk around the exterior of your home and visually check the trim around each window for cracks, gaps, or sections that look loose.
- Gently press or pull on the trim near the window edges; properly secured j-channel should feel solid and not shift easily.
- Look directly below each window for streaks, stains, or discoloration on the siding that might indicate water runoff problems.
- Check interior walls and window sills for soft spots, discoloration, or a musty odor that could point to hidden moisture.
- On a breezy day, run your hand slowly around the inside edges of your windows to feel for any drafts coming through gaps.
If any of these checks reveal a potential issue, it is worth having a professional take a closer look before the problem grows.
Adding or Retrofitting J-Channel to an Existing Home
Homeowners sometimes wonder whether j-channel can be added later if their home does not currently have it, particularly when planning a window replacement.
When Retrofitting Makes Sense
If your current windows already have built-in j-channel as part of their frame design, replacing them with new windows may require some adjustment to the surrounding siding and trim to maintain a proper seal. This is a common situation during full window replacement projects rather than something homeowners typically choose on their own.
Cost and Complexity Considerations
Retrofitting j-channel itself is generally inexpensive, often falling in a modest per-window price range. However, the overall cost can increase depending on how much surrounding siding needs to be adjusted, removed, or replaced to fit the new trim properly, which is why working with an experienced installer matters.
Choosing a Contractor Who Understands J-Channel Installation
Since j-channel plays such a key role in protecting your home, choosing the right installer is just as important as choosing the right window.
What to Look For in an Installer
A good contractor should be familiar with how vinyl siding interacts with window frames and should be able to explain exactly how they plan to handle trim and sealing during your project. Asking about their experience with similar homes in your area can give you a better sense of their expertise.
Questions Worth Asking Before Hiring
Before agreeing to any installation, it helps to ask about warranty coverage for both the window and the installation work, request examples of past projects, and have the contractor walk you through their finishing and sealing process step by step. Clear, confident answers to these questions are a good sign you are working with someone who takes j-channel seriously.
Frequently Asked Questions
What is j-channel used for in window installation?
J-channel is a vinyl trim piece that creates a clean border around windows and doors where they meet vinyl siding, while also helping direct water away from the window opening to prevent moisture problems.
Do all homes need j-channel around their windows?
No. Homes with vinyl siding almost always use j-channel, while homes with brick exteriors typically do not need it. Wood and aluminum siding fall somewhere in between.
Can j-channel be added to a home that does not currently have it?
Yes, though it usually involves adjusting the surrounding siding and is most commonly handled during a full window replacement rather than as a standalone project.
What problems can happen if j-channel is installed incorrectly?
Improper installation can lead to water leaks, drafts, mold growth, higher energy bills, and reduced lifespan for both the siding and the window itself.
How can I tell if my j-channel has failed?
Common signs include water stains on siding below windows, drafts near window edges, loose or gapping trim, and mold or musty smells near interior window frames.
Conclusion
J-channel may be a small piece of trim, but it plays a major role in keeping vinyl-sided homes protected from water damage, drafts, and energy loss. Understanding what it is, why it matters, and how to spot signs of trouble puts you in a much stronger position when planning a window replacement. Taking the time to ask the right questions and choose an experienced installer can make the difference between a smooth, long-lasting installation and costly repairs down the road.
Related Articles
How Long Does It Take to Do a Bathroom Renovation? Timelines, Phases & What to Expect
How Long Do Vinyl Windows Last? A Complete Guide
Why Does My Bathroom Smell Like Sewage? Causes, Fixes & Prevention Tips
Complete Guide to Roof Ventilation for Metal Roofs: Types, Benefits, Installation & Maintenance
How to Make Saltillo Floors Shine Again Expert Tips & Professional Solution