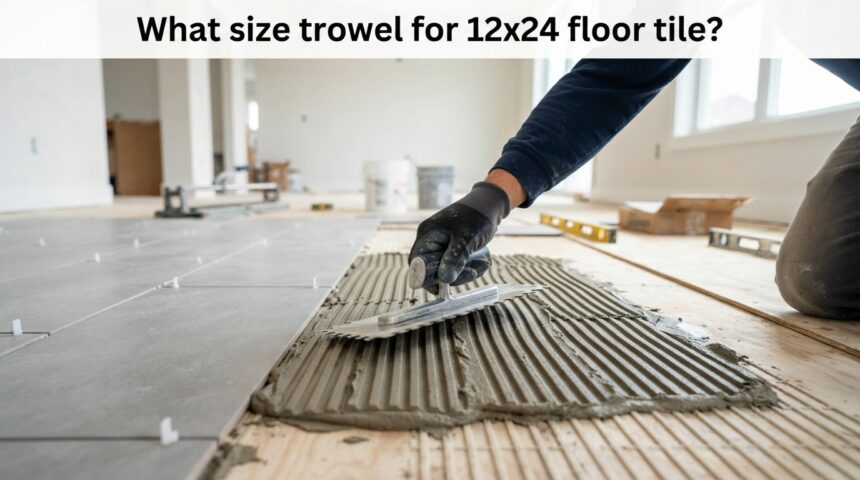
A 1/2 inch by 1/2 inch square notch trowel is the standard size for 12×24 floor tile. It puts down enough thinset to fully support a tile that size, without piling on so much mortar that it squeezes up through the grout lines. Some installers now use an equivalent U notch or Euro notch trowel instead of the classic square notch, and there is a good reason for that, covered below.
The trowel is only part of the job, though. What really keeps a 12×24 tile from cracking, sounding hollow, or popping loose later is how much of that trowel applied mortar actually touches the back of the tile. Get the trowel right and follow through with the technique, and a 12×24 floor holds up for decades.
Why 12×24 tile needs a bigger trowel than small tile
12×24 counts as large format tile. Anything with an edge 15 inches or longer falls into that category under the flatness and installation rules used across the tile industry, and a 24 inch edge clears that easily. Large format tile asks more of the mortar bed for two reasons.
First, a bigger tile has more surface area to support, so a thin, spotty mortar layer leaves weak spots that flex and eventually crack. Second, bigger tiles are more likely to have a slight warp or a textured back, and a deeper mortar ridge is what fills those gaps.
This is also why the floor itself has to be flatter for 12×24 tile than it does for something like 12×12. The flatness limit tightens to 1/8 inch over 10 feet for any tile with an edge past 15 inches, compared to 1/4 inch over 10 feet for smaller tile. A trowel can make up for small variations, but it cannot fix a floor that dips or humps beyond that.
Trowel size by tile size
Here is how notch size lines up with tile size in general, so you can see where 12×24 sits.
| Tile size | Trowel notch |
| Mosaics up to 2×2 in | 3/16 in V notch |
| Up to 8×8 in | 1/4 in x 1/4 in square notch |
| 12×12 in | 1/4 in x 3/8 in square notch |
| 13×13 in up to 16×16 in, and 12×24 in | 1/2 in x 1/2 in square notch, or an equivalent U notch |
| Larger than 16×16 in, or natural stone | 1/2 in to 3/4 in U notch, always back buttered |
Since 12×24 has a 24 inch edge, treat it the same as a 16 inch tile or larger, not like a 12×12. That is the detail that trips people up when they compare it to a same width tile that happens to be shorter.
Square notch or U notch: which is actually better?
A plain 1/2 inch square notch trowel gets the job done and it is what most hardware stores stock. But it is worth knowing that at least one major mortar manufacturer specifically advises against it for large format tile, according to its published large-format tile mortar guidelines. The gap between each square notch is wide enough that the mortar ridges do not always collapse evenly once the tile is set, which can leave narrow voids under the tile even when the coverage looks fine at a glance.
The fix is a trowel shape built to collapse more fully: a U notch, a slanted notch, or a dedicated large format trowel. A 3/4 inch U notch, for example, is built to lay down about the same amount of mortar as a 1/2 inch square notch while closing up more completely under the weight of the tile, which cuts down on trapped air and lippage. If you are setting a full 12×24 floor and want the best odds of full coverage, a U notch large format trowel is worth the few extra dollars over a basic square notch.
If you are only doing a small floor and the substrate is solid and flat, a good 1/2 inch square notch, combined with back buttering, still gets you there. The trowel matters, but technique matters just as much.
Do you need to back butter 12×24 tile?
Yes, you need to back butter 12×24 tile. Any tile with an edge over 15 inches should be back buttered, and 12×24 falls right into that rule. Back buttering means spreading a skim coat of thinset across the entire back of the tile with the flat side of the trowel, in addition to the mortar you comb onto the floor. It fills in any warp or texture on the tile itself, so the two mortar surfaces meet without gaps.
The standard technique is called double spreading. Comb the mortar on the floor in one direction with the notched side of the trowel. Then back butter the tile and comb it in a matching direction. When you set the tile down and press it in, the ridges collapse into each other instead of crossing at angles, which traps less air underneath.
How much mortar coverage do you actually need?
For a 12×24 floor tile in a normal dry room, the mortar needs to touch at least 80 percent of the tile’s back. In a shower, a bathroom floor near water, or anywhere outdoors, that jumps to 95 percent. These numbers come from the installation standard the tile industry uses to judge whether a job was done correctly, and they apply no matter which trowel you pick.
After the tile is pressed into place, the mortar bed underneath it should measure somewhere between 3/32 inch and 3/4 inch thick, with most installations landing well under half an inch. Too thin and the bond is weak. Too thick and the mortar takes longer to cure and gets more likely to shrink and crack.
Does the floor itself change what trowel you need?
A flat, solid floor and a wavy or patched one do not call for different trowel sizes so much as different prep work. If your subfloor has more than 1/8 inch of variation over a 10 foot span, no trowel size fixes that. You need to grind down the high spots or pour a self-leveling compound over the low ones before you ever pick up a trowel.
Natural stone changes things more than the floor does. A 12×24 travertine, marble, or slate tile needs 95 percent mortar coverage even in a dry living room, the same requirement as a wet area. Stick with a 1/2 inch or larger notch and back butter every stone tile, no exceptions, since voids under natural stone are what makes it crack under foot traffic.
What about a smaller trowel for a really flat floor?
Some installers get away with a 1/4 inch by 3/8 inch trowel on wall tile that is light and going onto a dead flat surface. That is a wall answer, though, not a floor one.
A floor takes foot traffic, furniture, and impact in a way a wall never does, so it needs the fuller mortar bed a 1/2 inch notch provides. Sizing down to save a bit of thinset on a floor is a common way to end up with hollow spots and cracked corners a year or two later.
Pairing the trowel with the right mortar
A 12×24 porcelain or ceramic floor tile on a stable subfloor usually does fine with a standard modified thin set mortar. If the tile is heavier, larger, natural stone, or going down over an uncoupling membrane or radiant floor heating, step up to a mortar labeled for large and heavy tile, sometimes shortened to LHT. These mortars are built to resist slump, hold their ridge shape under a bigger tile, and support more weight without the tile sliding while it sets.
Checking your coverage, leveling clips, and grout line width
Quick check: pull one tile back up within the first ten minutes or so of setting it, before the thinset skins over. Look at the back for an even, connected mortar layer with no bare gray patches, especially near the corners and edges.
Pulling a test tile is the fastest way to know your trowel choice is actually working. Patchy coverage on that one tile usually means the same gaps are happening across the whole room, so it is worth catching before you have covered ten more tiles the same way.
Trowel size and mortar coverage solve the bond underneath the tile. They do not solve lippage, which is when the edge of one tile sits slightly higher than its neighbor. For 12×24 tile, most installers also use leveling clips or wedges alongside the spacers that set the grout line.
These clips pull two adjoining tiles into the same plane while the mortar is still wet, then snap off once it cures. They are a separate tool from the trowel, but they matter just as much for a floor that reads flat and even once the tiles are set and the light hits it at an angle.
Grout line width plays a small role here too. Large format tile like 12×24 usually looks best with a grout line between 1/8 inch and 3/16 inch, wider than what you would use on a small mosaic. A slightly wider joint gives the tile a little more room to expand and contract, and it makes tiny variations in tile size less noticeable, which matters more with a 24 inch edge than it does with a 4 inch one.
Conclusion
For 12×24 floor tile, reach for a 1/2 inch by 1/2 inch square notch trowel or an equivalent U notch, and plan to back butter every tile.
Hit 80 percent mortar coverage in a dry room and 95 percent anywhere wet, keep the floor within 1/8 inch of flat over 10 feet, and pull a test tile early to check your coverage. Get those pieces right and a 12×24 floor stays flat, quiet underfoot, and crack free for years.
Frequently asked questions
Can I use a 1/4 inch trowel for 12×24 floor tile?
No. A 1/4 inch notch does not lay down enough mortar to properly support a tile this large. Use a 1/2 inch square notch or larger, and back butter the tile as well.
Do I really need to back butter 12×24 floor tile?
Yes. Any tile with an edge over 15 inches should be back buttered to reach full mortar coverage. Skipping it is one of the most common reasons large tiles crack or sound hollow.
What size trowel works for 12×24 tile on a wall?
A 1/2 inch square notch is still the safest choice. A 1/4 inch by 3/8 inch trowel can work on a wall if the surface is very flat and the tile is lightweight, but that is a wall-only shortcut.
How much mortar coverage do I need under 12×24 floor tile?
At least 80 percent in a normal dry room, and 95 percent in a bathroom, shower, or outdoor space. Pull a tile shortly after setting it to check the coverage on the back.
Is a U notch trowel better than a square notch for 12×24 tile?
For large format tile like 12×24, many pros prefer it. A U notch or slanted notch collapses more evenly under the tile than a plain 1/2 inch square notch, which lowers the risk of trapped air and voids.
Related Articles
Does Plumbing Use Electricity? A Complete Guide for Homeowners
How to Test for Asbestos in Popcorn Ceiling: Complete Homeowner Guide
How to Install Metal Roofing Over Shingles
Do Flat Sloped Roofs Perform Better Than a Gable Roof? Full Guide
How to Program a Garage Door Opener? Step-by-Step Guide for All Brands