Hanging wall cabinets is one of those jobs that feels overwhelming until you actually break it into stages. Once you understand how to hang wall cabinets properly, from finding the studs to locking the units together, the entire project becomes far less stressful than it looks.
This guide walks through every stage in plain language so that even a first-time DIYer can mount cabinets that stay level, secure, and safe for years.
What Tools and Materials Do You Need to Hang Wall Cabinets?
Before you lift a single cabinet, it helps to gather everything in one place so the job isn’t interrupted halfway through. Most of these items are inexpensive, and many can be borrowed or rented if you don’t already own them.
| Tool / Material | Why You Need It |
| Stud finder | Locates the wood framing behind the drywall so screws have something solid to bite into |
| Drill or impact driver | Creates pilot holes and drives the mounting screws without splitting the wood |
| Spirit level (a laser level helps too) | Confirms the cabinet is straight from side to side and from front to back |
| Tape measure and pencil | Marks the cabinet height, stud centers, and reference lines on the wall |
| Heavy-duty cabinet screws | Long enough to pass through the cabinet rail and sink deep into the stud |
| Wall plugs or anchors | Used only when you must fix into masonry or a section without a stud |
| Wood shims | Fill small gaps so the cabinet stays level even when the wall or floor isn’t perfectly flat |
| Scrap 1×3 or 2×4 board | Becomes the temporary ledger that carries the cabinet’s weight during installation |
| Bar clamps | Hold neighboring cabinet faces tightly together while they are screwed into one unit |
| Safety glasses and gloves | Protect your eyes and hands while drilling overhead and lifting heavy units |
Having this list ready before you start saves multiple trips back to the garage or hardware store once the cabinet is already in your hands.
How Do You Prepare the Wall Before Hanging Cabinets?
Good preparation is what separates a cabinet that lasts for decades from one that slowly pulls away from the wall. Spend a few extra minutes here, and the actual mounting step becomes far smoother.
Identify your wall type (timber stud, masonry, or plasterboard) to choose the correct fixings. Use a stud finder to locate and mark stud centers with light pencil lines. Draw a level reference line for the cabinet position—typically 450–500 mm above the countertop for kitchen cabinets. Before drilling, check for pipes, electrical cables, and outlet boxes behind the wall and mark their locations clearly.
How Do You Hang Wall Cabinets? The Five-Step Installation Process
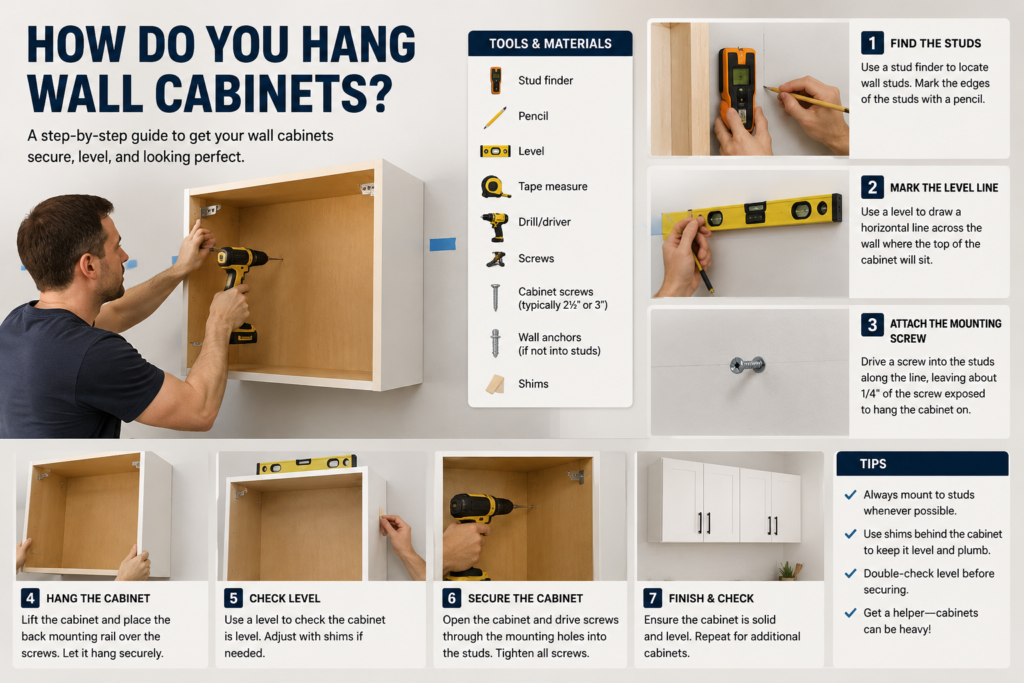
Hanging wall cabinets securely comes down to five core steps: locating the wall studs, installing a temporary ledger board for support, pre-drilling and mounting the first cabinet, locking adjoining cabinets together, and finally securing everything with heavy-duty screws.
Each of these stages is broken down individually below so nothing gets skipped.
Step 1: Locate the Wall Studs
Run the stud finder slowly across the level line you drew earlier and mark the center of each stud with a small pencil tick. Studs are typically spaced 16 or 24 inches apart, so once you find one or two you can often predict where the rest will be.
Screwing into solid framing rather than just drywall is what actually holds the weight of a loaded cabinet over time.
Step 2: Install a Temporary Ledger Board
Take your scrap 1×3 or 2×4 and screw it temporarily along the level line so its top edge matches where the bottom of the cabinet should sit. This board acts as a third pair of hands, supporting the full weight of the cabinet while you position and fasten it, which is especially useful if you are working alone.
Once the cabinet is securely screwed to the wall, this ledger is unscrewed and removed, leaving only one or two small holes to patch.
Step 3: Pre-Drill and Mount the First Cabinet
Lift the cabinet onto the ledger board and press it flush against the wall, lining the top rail up with your stud marks. Drill pilot holes through the back rail of the cabinet at each stud location to prevent the wood from cracking, then drive screws in partway so the cabinet can still be nudged into place.
Check level across the top, diagonally, and along the side before tightening anything fully, adjusting with shims wherever the wall or floor is uneven.
Step 4: Lock Adjoining Cabinets Together
Slide the next cabinet into place beside the first and align the face frames so the edges sit perfectly flush with no visible step between them. Use a bar clamp to hold the two frames together, then drill through both frames near the top and bottom and join them with screws, usually hidden once the doors are reattached.
Repeating this for every cabinet in the row turns several individual boxes into one rigid, continuous unit that resists twisting or sagging.
Step 5: Secure with Heavy-Duty Screws
With the cabinets aligned, joined, and double-checked for level, drive the heavy-duty cabinet screws the rest of the way into each stud location, working from one side of the run to the other. Give the cabinets a firm push test to confirm there is no movement before loading them with dishes, tools, or supplies.
Finally, remove the temporary ledger board and patch the small screw holes it leaves behind.
What Common Mistakes Should You Avoid When Hanging Wall Cabinets?

A surprising number of cabinet failures come down to a handful of repeated mistakes rather than bad luck or bad cabinets. Knowing these ahead of time means you can sidestep them entirely.
- Skipping the stud finder and relying on drywall anchors alone, which are rarely rated for the combined weight of a cabinet plus its contents.
- Measuring once instead of double-checking, which leads to cabinets that look level individually but don’t line up correctly as a row.
- Forgetting to account for outlet boxes or pipework before the cabinet goes up, forcing awkward cuts after installation instead of before it.
- Removing the ledger board too early, before every screw is fully tightened, which puts unexpected strain on the screws that are already in.
- Ignoring uneven walls or floors and skipping shims, which leaves doors that won’t close evenly or gaps between neighboring units.
Frequently Asked Questions
Can one person hang wall cabinets alone?
Yes, a temporary ledger board makes solo installation realistic by supporting the cabinet’s weight while you drill and screw it in place. For very large or heavy units, having a second person nearby for the initial lift is still a good safety precaution.
What if my wall isn’t perfectly flat?
Wood shims behind the cabinet back or sides can correct small irregularities so the unit still sits level. For more significant dips or bumps, adjustable hanging brackets give extra flexibility to compensate.
Do I always need to screw into a stud?
Whenever possible, yes, since studs provide the strongest anchor point for a loaded cabinet. If no stud is available at a particular spot, heavy-duty anchors rated for the wall type can be used as a backup, though they shouldn’t replace stud fixings entirely.
How high should wall cabinets be mounted?
In a kitchen, cabinets are usually placed 450 to 500 millimeters above the worktop, though this can shift slightly to match an adjoining tall unit. In a garage or utility room, height is mostly a matter of personal reach and ceiling clearance.
Conclusion
Once broken into stages, how to hang wall cabinets stops being a mystery and becomes a manageable weekend project. Finding the studs, supporting the cabinet on a ledger board, mounting it carefully, joining it to its neighbors, and finishing with strong screws covers everything needed for a secure result.
Follow each step in order, double-check the level as you go, and the cabinets will stay solid for years of everyday use.
Related Articles
Why Does My Bathroom Smell Like Sewage? Causes, Fixes & Prevention Tips
Can You Paint Roof Shingles? Pros, Cons, and Best Practices
Why Does My Bathroom Smell Like Sewage? Causes, Fixes & Prevention Tips
How to Make Saltillo Floors Shine Again Expert Tips & Professional Solution