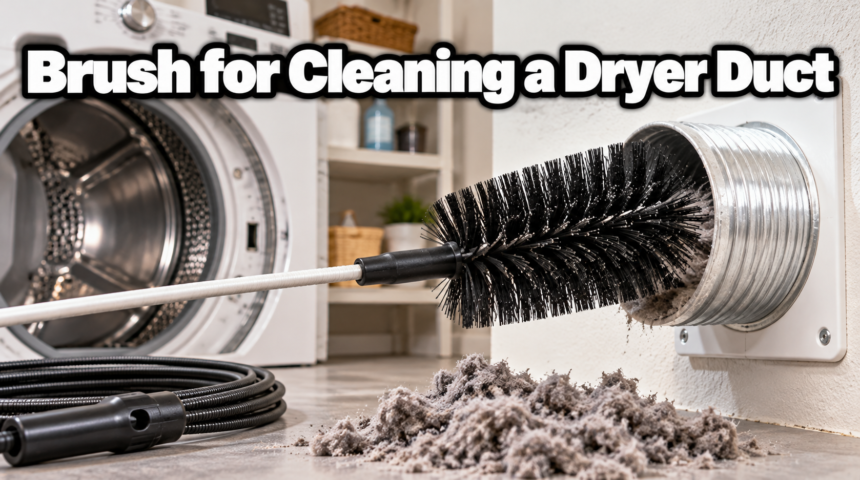
The best brush for cleaning a dryer duct is a flexible nylon-bristle brush mounted on long, link-together rods, ideally one you can spin with a cordless drill. This setup reaches the full length of the duct, bends around elbows, and pulls out packed lint without scratching the metal. A short handheld lint brush helps too, but on its own it cannot reach past the first foot or two.
Lint is the real problem here. It slips past the lint screen, rides the warm air into the duct, and settles on the walls a little more with every load. Over months that fuzzy layer narrows the pipe, traps heat, and makes the dryer work harder. Cleaning the duct with the right brush fixes all three at once, and it is a job most people can do in under an hour with about $20 to $35 of gear.
What kind of brush actually cleans a dryer duct?
Three tools get used for this job, and they are not interchangeable.
A lint trap brush is a thin, bottle-style brush on a long wire handle, usually about two feet. It is made for the lint screen slot and the short gap right behind the dryer, not the whole duct. Keep one around, but do not expect it to clean a run that goes up through a wall or across a ceiling.
A flexible rod brush kit is the main tool. It has a round brush head, often with nylon bristles, screwed onto a set of bendy fiberglass or plastic rods that join end to end. You add rods until the brush reaches the far end of the duct. Because the rods flex, the brush follows the pipe around bends instead of jamming at the first elbow.
A drill-powered brush is the same idea with a hex or threaded adapter on the end, so a cordless drill can spin it. The spinning head grabs lint far better than pushing a still brush back and forth, which is why most kits now include a drill adapter. For almost everyone, a flexible rod kit with a drill adapter is the right buy. Here is how the three compare.
| Tool | Reach | Best for | Drill needed |
| Lint trap brush | 1 to 2 ft | Lint screen slot, behind the dryer | No |
| Flexible rod kit (manual) | 10 to 40 ft | Full duct, straight or bent | Optional |
| Drill-powered rod kit | 10 to 40 ft | Full duct, packed lint, long runs | Yes |
How long should the brush and rods be?
Match the total rod length to your duct, then add a little margin. Most dryer ducts run between 5 and 25 feet from the machine to the outside vent. A kit with about 12 feet of rod handles a typical straight run behind a laundry room. For a duct that climbs through a wall or crosses a ceiling to the roof, look for 20 to 40 feet of combined rod.
Measure before you buy if you can. Follow the duct from the back of the dryer to where it exits the house and count the feet, including any vertical rise. Rods come in sections you screw together, so a longer kit still works fine on a short duct. You just use fewer rods. Buying too short is the common mistake, since a brush that stops halfway leaves the worst buildup untouched at the far end where it packs the hardest.
Drill-powered or turned by hand?
Go with a drill-powered kit if you own a drill. The spinning brush flicks lint off the duct walls and walks itself along the pipe, so you guide it rather than scrub. It clears packed lint and long vertical runs that a hand-pushed brush struggles with, and it finishes the job in a fraction of the time.
A manual rod brush still works on a short, straight duct. You push and pull the brush through by hand and twist it as you go. It costs a little less and needs no drill, but it takes more effort and does a lighter job on stubborn buildup. If your duct is more than a few feet or has any bends, the drill version is worth the small extra cost.
One rule matters with a drill: keep the speed low and only ever run it clockwise. Spinning too fast can whip the rods or unscrew a joint inside the duct, and reversing can unthread a rod and leave it stuck in the pipe.
How to clean your dryer duct with a brush
You can do this from either end. Cleaning from the outside vent is easiest because you do not have to move the dryer, though pulling the machine out lets you clean the hose behind it at the same time. Here is the full method.
- Unplug the dryer. If it runs on gas, turn off the gas valve too. Do this before anything else.
- Pull the dryer out and disconnect the duct. Slide the machine away from the wall, loosen the clamp, and pull the flexible hose off the wall duct. Clean that short hose by hand with a lint trap brush.
- Clear the vent cap outside. Go to where the duct exits the house and open or remove the outside flap. Pull out any lint, leaves, or bird nests sitting in the opening.
- Attach the brush and first rod. Screw the brush head onto one rod, and fit the drill adapter on the other end if you are using a drill.
- Feed the brush in and start the drill. Push the spinning brush into the duct. Run the drill at low speed, clockwise only, and move the brush in slowly so it sweeps instead of shoves.
- Add rods as you go. When a rod is almost all the way in, stop the drill, screw on the next rod, and keep feeding. Work the brush in and out a few inches at a time to loosen the lint.
- Stop when you feel the end. Light resistance, or the brush poking out the other side, means you have reached the far end. Pull the brush back out slowly, still spinning, to drag lint with it.
- Vacuum the loose lint. Use a shop vacuum at the duct opening and around the floor to pick up everything the brush knocked free.
- Reconnect and test. Reattach the hose, push the dryer back, plug it in, and run it on the air-only setting for a few minutes. Check that air blows strongly from the outside vent.
Wear safety glasses and a dust mask while you work. Brushing a duct kicks up a cloud of fine lint, and you do not want it in your eyes or lungs.
Common mistakes to avoid
A few small errors turn an easy job into a frustrating one. Skip these and the cleaning goes smoothly.
- Running the drill too fast. High speed whips the rods and can snap a joint. Keep it slow and let the brush do the work.
- Reversing the drill direction. Spinning counterclockwise unthreads the rods, and a rod left in the duct is a real headache to fish out.
- Forcing the brush past a tight bend. Ease it through with short back-and-forth pushes instead of shoving, so the rods do not kink or separate.
- Skipping the outside vent cap. Most clogs build up right at the exit flap, so clearing it first makes the rest of the job faster.
- Using a brush that is too short. If it cannot reach the far end, the thickest lint stays put. Measure your duct and buy with margin.
Brush kit vs. vacuum attachment: which clears more?
A brush kit and a vacuum lint attachment do different parts of the same job, and the brush is the one that actually cleans. A vacuum hose attachment reaches a foot or two into the duct and sucks up loose, surface lint. It is handy for the lint screen housing and the mouth of the duct, but it cannot scrub the caked layer off the walls deep inside a long run.
The brush is what breaks that packed lint loose. The smart approach uses both: brush the duct to knock the buildup free, then run a shop vacuum at the opening to pull out everything the brush dislodged. If you can only buy one tool, buy the rod brush kit. A vacuum alone leaves the worst of the clog behind.
What else you need for the job
The brush kit does most of the work, but a few extra items make the cleaning faster and cleaner.
- A cordless drill, for the spinning action that clears packed lint.
- A shop vacuum, to pull out the lint the brush knocks loose.
- A screwdriver or nut driver, to loosen the hose clamp behind the dryer.
- Safety glasses and a dust mask, since brushing throws up fine lint.
- A short lint trap brush, for the screen slot and the hose behind the machine.
None of this is expensive, and you reuse it every time. Set it all out before you start so you are not hunting for a tool with a brush stuck halfway down the duct.
Signs your dryer duct needs cleaning
Your dryer usually tells you when the duct is clogging. Watch for these warning signs.
- Clothes come out damp and need a second cycle to dry.
- Drying takes much longer than it used to, often 60 minutes or more for a normal load.
- The dryer or the laundry room feels hot to the touch during a cycle.
- A burning or musty smell shows up when the dryer runs.
- The outside vent flap barely opens, or little air comes out of it.
- Lint shows up around the back of the dryer or near the vent opening.
Any one of these is a reason to clean the duct. Several at once means it needs doing now, because a blocked duct is also a fire risk.
How often should you clean a dryer duct?
Clean the full duct at least once a year. Busy households, large families, or homes with a long or twisty duct should do it every six months. If you dry heavy loads most days, or a lot of thick items like towels and bedding, lean toward the shorter schedule.
This is more than an efficiency habit. Clothes dryers are involved in thousands of home fires every year, and the leading cause is simple: failure to clean them. In one national count, dryers accounted for 92 percent of dryer and washing machine fires, and failing to clean was behind about a third of them. A yearly brush-out is cheap insurance. You can read the full list of safe-use tips in NFPA’s dryer and washer safety guidance.
Also clean the lint screen after every single load. The screen catches most of the lint, and a clean screen means less of it reaches the duct in the first place. The duct brush handles what slips past.
Choosing and buying the right kit
Look for four things when you pick a kit. First, enough rod length for your duct with margin to spare. Second, a drill adapter, so you get the spinning action that does the hard part. Third, nylon or synthetic bristles, firm enough to lift lint but soft enough not to gouge the metal. Fourth, rods that lock or screw together tightly, since a loose joint can come apart inside the pipe.
Basic kits start cheap and climb with length and extra brush heads. A drill-powered kit such as the Dundas Jafine drill-powered dryer vent brush is a common pick, and many 20 to 30 foot kits bundle two brush heads for different pipe sizes. Spend based on your duct length and how often you will use it, not on the biggest kit on the shelf.
Conclusion
To clean a dryer duct well, use a flexible nylon-bristle brush on link-together rods long enough to reach the far end, and spin it with a drill on low speed, clockwise only. Clear the vent cap, work the brush through from outside, vacuum the loose lint, and run the dryer on air to blow out the rest. Do this once or twice a year, keep the lint screen clean after every load, and your dryer will run faster, safer, and cheaper.
Frequently asked questions
Can I clean my dryer duct without moving the dryer?
Yes. Work the brush in from the outside vent cap instead. You should still clean the short hose behind the dryer at some point, but the main duct cleans fine from the exterior end.
What length brush do I need for my dryer vent?
Match the rod length to your duct, which is usually 5 to 25 feet. A 12-foot kit suits a short straight run, and 20 to 40 feet covers a duct that climbs a wall or crosses the ceiling.
Will a dryer vent brush damage the duct?
Not if you use it right. Nylon bristles are soft on metal, and keeping the drill slow and clockwise prevents whipping or unthreading. Rigid metal ducts handle it best; thin foil hose is more delicate.
Can I use a regular drill with a dryer vent brush kit?
Yes. A standard cordless drill works fine. Run it on a low speed setting and clockwise only, and stop to add rods rather than forcing the brush deeper.
How do I know the duct is actually clean?
Run the dryer on the air setting and check the outside vent. Strong, steady airflow and no more lint coming out of the opening means the duct is clear.
Related Articles
Do You Need Gutters with a Metal Roof?
How Long Does It Take to Install a Garage Door?
How Do You Hang Wall Cabinets? A Complete Step-by-Step Guide