To install a dryer vent hose, connect a 4-inch metal duct from the back of your dryer to the wall outlet, clamp and tape both ends, keep the run as short and straight as you can, and make sure it sends the air outside. Done right, the job takes about an hour and needs only a few basic tools. This guide walks you through the whole thing, from picking the right hose to testing the airflow at the end.
Getting this right matters for more than tidy laundry. A blocked or crushed vent traps hot, damp, lint-filled air, which makes your dryer work harder and can start a fire. Failure to keep dryer venting clean and clear is the leading factor in home dryer fires, so a short, clean metal run is one of the simplest safety upgrades in the house. It also cuts drying time, which saves energy on every load.
What you will need?
Grab these before you start so you are not stuck halfway with the dryer pulled out into the middle of the room:
Materials: a 4-inch metal dryer vent hose (rigid or semi-rigid), two adjustable clamps, a roll of UL-listed foil tape, and one or two vent elbows if your path turns a corner.
Tools: a tape measure, a screwdriver or nut driver, tin snips, a vacuum, and a pair of work gloves. Cut metal duct has sharp edges, so the gloves are not optional.
A shallow offset connector, sometimes sold as a dryer vent periscope, is worth adding to the list if the dryer sits close to the wall. It replaces a bulky loop of hose with a flat channel, so you can push the machine back without crushing anything.
What kind of dryer vent hose should you use?
Use rigid or semi-rigid metal duct, four inches across. Metal holds its shape, handles heat, and lets lint slide through instead of catching on ridges. Rigid pipe is the best performer for the run inside a wall or along a long straight path, because its smooth walls barely slow the air at all. Semi-rigid metal is the right choice for the short connector behind the dryer, since it bends around a tight space without collapsing flat.
Skip the thin white plastic and the flimsy silver foil accordion hose for any permanent run. They sag, crush easily, and their deep ridges grab lint, which is exactly what you are trying to prevent. Plastic can also soften under the heat a dryer produces. Here is how the common options compare:
| Hose type | Best use | How it handles lint and airflow |
| Rigid metal pipe | Long runs or inside a wall | Smooth walls, least lint, best airflow |
| Semi-rigid metal | Short connector behind the dryer | Bends without collapsing, good airflow |
| Foil accordion hose | Not for permanent runs | Deep ridges trap lint, crushes easily |
| White plastic hose | Avoid entirely | Traps lint and can soften with heat |
If you already have plastic or foil hose behind your dryer, swapping it for metal is the single biggest improvement you can make while you are back there anyway. It costs a few dollars and takes minutes.
How long can a dryer vent hose be?
Keep the total run under 35 feet of 4-inch metal duct, then subtract for every bend. Each 90-degree elbow counts as about 5 feet, and each 45-degree elbow counts as about 2.5 feet. So a run with two right-angle turns leaves you roughly 25 feet of usable straight length. Your dryer manual can list a shorter limit, and the manual always wins over the general rule.
The flexible piece that connects the dryer to the wall outlet has its own name: the transition duct. Keep it to 8 feet or less, and never hide it inside a wall, floor, or ceiling. Only smooth metal duct belongs in those concealed spaces. If you want the exact figures for your area, the residential code that most towns follow spells out dryer duct length, material, and support, and your local building department can confirm any local changes.
Shorter and straighter is always better. Every extra foot and every turn slows the airflow, leaves more room for lint to settle, and adds time to each cycle. When you can choose the route, pick the one with the fewest bends and the closest exterior wall.
What if the dryer is far from an outside wall?
Run rigid 4-inch metal pipe for the long stretch and use elbows only where the path has to turn. Rigid pipe moves air far better than flexible hose over distance, so a longer straight run in smooth metal often performs better than a short one full of bends.
Support horizontal runs every few feet with pipe straps so the duct cannot sag, and slope the run slightly down toward the outside so any moisture drains out rather than pooling. If the total length pushes past the limit even in metal, a booster fan made for dryer ducts is the proper fix, not a longer hose.
Electric and gas dryers: what changes
The venting itself is the same size and material for both. The difference is how you cut the power and handle the machine. For an electric dryer, unplug it at the outlet before you move it.
For a gas dryer, shut off the gas supply valve first, and take care not to strain or twist the flexible gas connector while you slide the unit out. If you smell gas at any point, stop, leave, and call your gas provider. When in doubt with a gas hookup, a licensed installer is money well spent.
How to install a dryer vent hose, step by step
Set aside about an hour, and work in this order.
- Unplug the dryer and pull it out. Switch off the power at the outlet, or shut the gas valve for a gas model, then slide the dryer far enough from the wall to reach behind it comfortably. Give yourself room to work with both hands.
- Clean the outlet and the wall duct. Pull off any old hose and vacuum lint from the dryer’s exhaust outlet, the wall duct opening, and the floor. Starting clean means you are not sealing yesterday’s buildup inside a brand-new run.
- Measure the path. Run your tape measure from the dryer’s exhaust outlet to the wall duct, following the exact route the hose will take, including any bend. Add half an inch at each end for overlap so the hose seats fully over the collars.
- Cut the hose to length. Mark your measurement on the metal duct and cut it with tin snips while wearing your gloves. Test-fit the piece before you fasten anything, and add an elbow if the path needs to turn, rather than forcing a sharp kink.
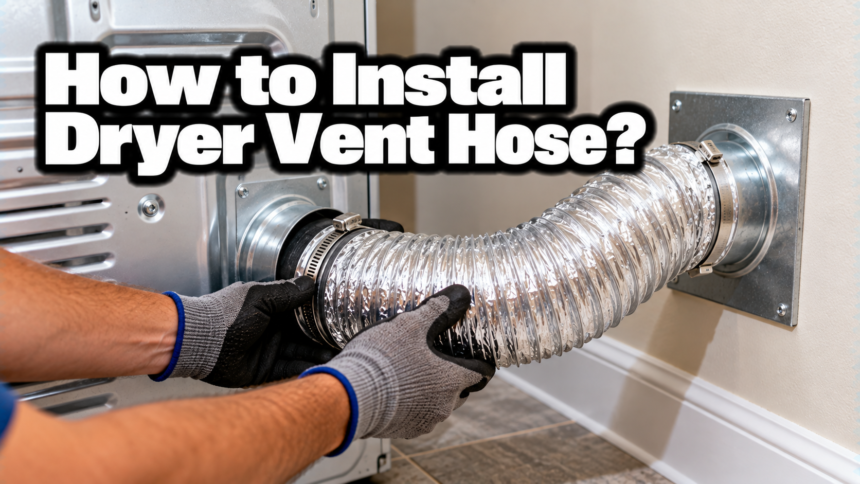
- Connect the hose to the wall duct. Slide one end of the hose over the wall duct collar. Slip a clamp over the joint, tighten it with your screwdriver until snug, then wrap the seam with foil tape for an airtight fit. Foil tape is the only tape rated for the heat a dryer puts out, so leave the regular duct tape in the drawer.
- Connect the hose to the dryer. Fit the other end over the dryer’s exhaust outlet, add the second clamp, tighten, and seal that seam with foil tape too. Do not drive sheet-metal screws through the duct to hold it. Screw tips poke into the airflow and snag lint until they clog, so clamps and tape are the safe way to join every seam.
- Check the outside vent. Step outside and look at the vent hood. The flapper, or damper, should swing open freely when the dryer runs and drop shut when it stops. Clear any lint from around the opening. Make sure there is no insect screen across it, because a screen turns into a lint trap fast and chokes the airflow.
- Reposition the dryer and test. Ease the dryer back toward the wall, guiding the hose so it curves gently instead of folding flat. Leave a few inches of clearance so nothing gets crushed. Plug the dryer back in, run a heat cycle for a few minutes, and confirm you feel warm air pushing out of the outside vent.
Quick tip: If the dryer sits tight against the wall, use that shallow periscope connector so the hose cannot get pinched. A pinched hose kills airflow even when everything else is done perfectly.
Signs your vent hose is installed right
You do not need special tools to tell a good install from a bad one. When the dryer runs, warm air should push steadily out of the exterior vent, and the outdoor damper should stay open the whole cycle. Behind the machine, the hose should curve in a smooth arc with no flat spots, kinks, or sagging loops. Inside, clothes should come out dry in a single normal cycle. If a load now takes two cycles, or the dryer top feels very hot, airflow is being choked somewhere and the run is worth a second look.
Mistakes that cause problems later
A few small errors turn a solid install into a slow, risky one. The most common is leaving too much slack, which lets the hose sag into low spots where lint and moisture pool. Cut it to fit and support any long run so it does not droop.
Screws inside the duct are another frequent issue. Every screw tip acts as a lint hook, and over time those spots build into a blockage. Clamps and foil tape hold just as firmly without reaching into the airflow.
Mismatched sizing causes trouble too. Stick with 4-inch duct end to end, and do not pinch it down to squeeze behind a tight cabinet. A narrower section acts like a bottleneck, backing up hot air and lint behind it. It also helps to recheck the run a day after you finish: pull the dryer out an inch, look for fresh kinks or a loose clamp, and confirm the outdoor damper still opens cleanly on a running cycle.
Finally, never vent a dryer into an attic, crawlspace, or garage. Warm, damp air indoors breeds mold and dumps lint where you cannot see it. The vent has to reach outside, with no exceptions. Cleaning the whole path once a year keeps airflow strong and lowers fire risk, which is the real payoff of a careful install.
Conclusion
Installing a dryer vent hose comes down to a few clear moves: run 4-inch metal duct, keep it short and as straight as possible, clamp and foil-tape every seam instead of using screws, and confirm the air exits outside. A good result is warm air pushing steadily from the outdoor vent, clothes drying in one cycle, and no crushed or sagging duct behind the machine. Clean the run once a year and it will keep working safely for years.
Frequently asked questions
Can I use a foil or plastic dryer vent hose?
Use metal instead. Rigid or semi-rigid 4-inch metal duct resists heat and lets lint slide through. Thin foil and white plastic hoses sag, trap lint, and can soften under heat, so they are a poor choice for any permanent run.
How long can a dryer vent hose be?
Keep the total run under 35 feet of 4-inch metal duct. Subtract about 5 feet for each 90-degree bend and 2.5 feet for each 45-degree bend. Your dryer manual may set a shorter limit, and that limit always wins.
Should I use screws or tape to hold the hose?
Use clamps and foil tape, never screws. Screw tips poke into the duct and catch lint until they clog. Adjustable clamps plus UL-listed foil tape make a firm, airtight seam without reaching into the airflow.
How do I know the vent is installed correctly?
Run the dryer and check the outside vent. Warm air should push out steadily and the damper should stay open. Behind the machine the hose should curve smoothly with no kinks, and clothes should dry in one normal cycle.
Do I need a metal transition duct behind the dryer?
Yes. The transition duct is the flexible piece between the dryer and the wall. Keep it to 8 feet or less, use metal, and never run it inside a wall or ceiling, where only smooth rigid duct belongs.
Related Articles
What Size Trowel for 12×24 Floor Tile?
How Far Apart Should Floor Joists Be?