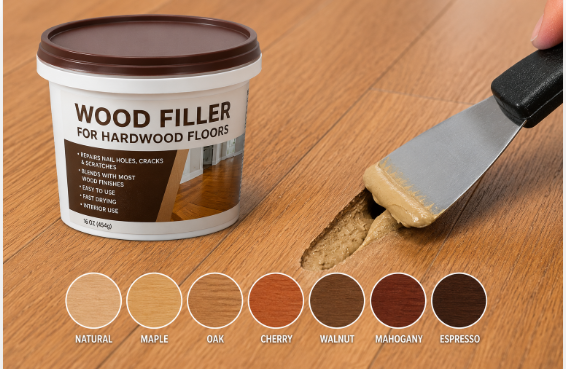
Hardwood floors are a long-term investment, and keeping them in top shape requires the right maintenance approach. Over time, even the most durable hardwood floors develop gaps, cracks, scratches, and dents. Wood filler is one of the most practical and cost-effective solutions to restore the look and integrity of your floors without replacing entire planks.
Understanding how to choose and apply the right wood filler can make a noticeable difference in both appearance and longevity.
What Is Wood Filler and Why Does It Matter for Hardwood Floors?
Wood filler is a paste-like compound designed to fill voids, gaps, holes, and cracks in wood surfaces. For hardwood floors specifically, it plays a crucial role in preventing further damage, moisture intrusion, and structural weakening.
Types of Damage Wood Filler Can Repair
Hardwood floors face a variety of issues depending on age, foot traffic, and environmental conditions. Wood filler is effective for addressing several types of damage including:
- Small to medium gaps between planks caused by seasonal wood movement
- Surface scratches and gouges from furniture, pets, or heavy objects
- Nail holes left after installation or repairs
- Knot holes and natural wood imperfections
- Edge cracks where planks meet walls or thresholds
When Wood Filler Is Not the Right Solution
Wood filler works well for minor to moderate repairs, but it has clear limitations. If your hardwood floor has deep structural cracks running through multiple planks, severe water damage, or widespread warping, wood filler alone cannot provide a lasting fix. In those cases, plank replacement or professional refinishing is necessary.
Using filler on damage that exceeds its capability leads to crumbling, color mismatch, and repeated repairs.
Types of Wood Filler for Hardwood Floors
Choosing the correct type of wood filler is just as important as the application technique. Different formulas serve different purposes, and using the wrong one leads to poor adhesion, cracking, or color mismatch after staining.
Water-Based Wood Filler
Water-based fillers are the most popular choice for interior hardwood floors. They dry quickly, produce low odor, and clean up easily with water. These fillers are compatible with most water-based stains and finishes, making them ideal for floors that will be refinished after repair. They tend to shrink slightly as they dry, so slightly overfilling the area is recommended.
Solvent-Based Wood Filler
Solvent-based fillers offer stronger adhesion and are more durable in high-traffic areas. They are particularly useful when the floor uses an oil-based finish, since they bond better with oil-based topcoats.
However, these fillers have a stronger odor and require proper ventilation during application. They also take longer to dry compared to water-based options.
Epoxy Wood Filler
Epoxy-based wood fillers are two-part compounds that provide exceptional strength and durability. They are best suited for larger gaps and deep cracks where flexibility and load-bearing capacity are needed.
Epoxy fillers do not shrink and resist moisture better than other types, though they are harder to sand and may not accept stain as evenly as traditional fillers.
Latex Wood Filler
Latex-based fillers are flexible and work well in areas with slight movement, such as gaps between planks that expand and contract with seasonal humidity changes.
Their flexibility reduces the chance of cracking after the repair dries, making them a practical choice in climates with significant seasonal variation.
Comparison Table: Wood Filler Types at a Glance
| Filler Type | Drying Time | Shrinkage | Stainable | Best For |
| Water-Based | 30–60 min | Slight | Yes | General repairs, refinishing |
| Solvent-Based | 1–2 hours | Minimal | Yes | High-traffic, oil-finish floors |
| Epoxy | 4–8 hours | None | Limited | Deep cracks, large gaps |
| Latex | 1–2 hours | Minimal | Yes | Seasonal movement areas |
How to Choose the Right Wood Filler Color
One of the most common mistakes when repairing hardwood floors is choosing a filler that does not match the wood’s color after finishing. Color matching requires attention to both the raw wood tone and the final stain or finish coat.
Matching Filler to Your Floor Finish
Always test the filler on a small, hidden area of the floor before committing to the full repair. Some fillers are sold in natural wood tones like oak, walnut, cherry, and pine. If your floor will be sanded and restained, choose a filler that is close to the raw wood color and matches your intended stain. If the floor has an existing finish and you are doing a spot repair, match the filler as closely as possible to the finished floor color.
Many home improvement stores carry color charts and sample packs to assist with matching.
Can You Tint Wood Filler?
Some water-based and latex fillers can be tinted by mixing in small amounts of wood stain or universal colorant before application. This gives you more control over the final color, especially for spot repairs where the surrounding floor has an unusual tone.
However, always test the tinted mixture on scrap wood before applying it to the floor, as the dried color may differ from the wet mixture.
Step-by-Step Application Guide
Proper preparation and technique determine whether your wood filler repair lasts for years or starts crumbling within weeks. Follow these steps carefully for the best results.
Tools you will need:
- Putty knife or flexible scraper
- Fine-grit sandpaper (120–220 grit)
- Vacuum or tack cloth
- Wood filler of your choice
- Stain or finish (if refinishing after repair)
Step 1 — Clean the Damaged Area: Remove all dust, debris, loose wood fibers, and any old filler from the crack or gap. A clean surface ensures proper adhesion. Use a vacuum followed by a tack cloth for best results.
Step 2 — Apply the Filler: Using a putty knife, press the filler firmly into the gap or crack, working it in at an angle to eliminate air pockets. Slightly overfill the area to account for shrinkage as the filler dries.
Step 3 — Allow Full Drying: Follow the manufacturer’s drying time instructions. Rushing this step by applying heat or foot traffic causes the filler to crack or pull away from the edges.
Step 4 — Sand Smooth: Once fully dry, sand the filled area flush with the surrounding floor surface using fine-grit sandpaper. Sand in the direction of the wood grain to avoid scratching the floor around the repair.
Step 5 — Finish and Seal: If you are refinishing the floor, apply stain followed by your chosen topcoat. For spot repairs on an existing finished floor, apply a matching finish coat over the repaired area to blend it with the surrounding floor.
Common Mistakes to Avoid
Even experienced DIYers make errors when working with wood filler on hardwood floors. Being aware of these mistakes saves time and avoids redoing the repair.
- Skipping surface preparation — Filler applied over dust or grease will not bond properly and will fall out.
- Using the wrong filler type — A rigid filler in a floor with seasonal movement will crack repeatedly.
- Not accounting for shrinkage — Under-filling leads to a sunken repair that is visible after drying.
- Sanding across the grain — This creates visible scratch marks that show up clearly under finish.
- Applying finish before filler is fully dry — Trapping moisture under the finish leads to bubbling and peeling.
Wood Filler vs. Wood Putty: Understanding the Difference
Many people use the terms wood filler and wood putty interchangeably, but they are different products with different purposes. Wood filler is generally harder when dry, sandable, and intended for raw or unfinished wood. It is designed to be used before staining and finishing. Wood putty, on the other hand, is flexible and oil-based, designed for use on finished wood surfaces where it will not be sanded or stained.
For hardwood floor repairs that will be refinished, wood filler is the correct choice. For touch-ups on an already-finished floor, wood putty may be more appropriate.
FAQs
Can wood filler be used on large gaps in hardwood floors?
For gaps wider than 3–4mm, epoxy or flexible latex filler works better than standard fillers, as large gaps require a product that resists cracking under pressure and wood movement.
How long does wood filler last on hardwood floors?
A properly applied filler in a low-traffic area can last several years. High-traffic zones may require re-application every one to two years depending on wear and movement.
Does wood filler accept stain the same way as real wood?
Most stainable fillers absorb stain differently than surrounding wood, so the repair may appear slightly lighter or darker. Always test before applying stain to the full floor.
Conclusion
Wood filler is a reliable and accessible way to restore hardwood floors without major renovation. Choosing the right type, matching the color carefully, and applying it correctly ensures a repair that blends naturally and holds up over time. Whether you are tackling nail holes, seasonal gaps, or surface scratches, understanding the product you are using leads to results that are both lasting and visually clean.
Related Articles
How to Clean Faux Suede Furniture Without Ruining It?
Brass Kitchen Faucets: Types, Benefits, Buying Guide, and Maintenance Tips
Wood Filler for Hardwood Floors: Your Complete Guide