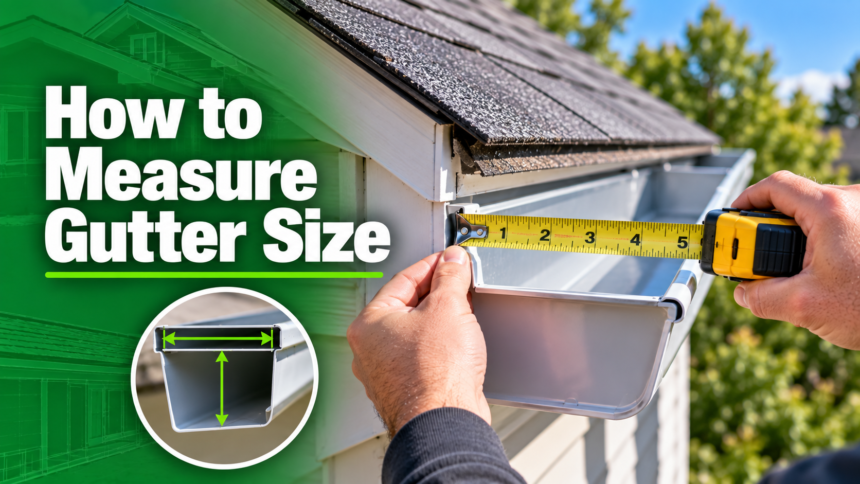
If your home’s gutters keep overflowing during heavy rain, or you’re planning a replacement project, the very first thing you need to nail down is size. Knowing how to measure gutter size correctly is the foundation of any successful gutter installation or repair job, and getting it wrong can lead to water pooling near your foundation, sagging troughs, and a system that simply can’t keep up with the weather in your area.
Measuring gutters isn’t complicated, but it does require a bit of patience and the right approach. Whether you’re a homeowner planning a DIY replacement, a first-time buyer trying to understand what’s already installed on your house, or a contractor double-checking specs before an order, this guide walks you through everything step by step, in plain and simple language.
By the end of this article, you’ll understand not just how to measure gutter size using a tape measure, but also how to figure out what size your home actually needs based on your roof and local rainfall.
Understanding Gutter Basics
Before picking up a tape measure, it helps to understand what you’re actually looking at. A gutter system is the network of channels and pipes that catches rainwater running off your roof and directs it safely away from your home’s walls and foundation. Without gutters, water would fall straight off the roof edge, splash against the siding, and eventually pool around the base of the house, causing everything from basement leaks to cracked foundations over time.
A complete gutter system has a few main parts working together. The gutter itself is the long horizontal trough attached along the roofline. Downspouts are the vertical pipes that carry water from the gutter down to the ground or a drainage system. Hangers and brackets hold the gutter firmly against the fascia board, and end caps seal off the open ends of the gutter run so water doesn’t spill out the sides.
Gutters are made from several different materials, each with its own feel and durability profile:
| Material | Typical Lifespan | Notes |
|---|---|---|
| Aluminum | 20–25 years | Lightweight, rust-resistant, most popular |
| Vinyl (PVC) | 10–20 years | Budget-friendly, easy DIY install |
| Galvanized Steel | 15–20 years | Sturdier, heavier, can rust over time |
| Copper | 50+ years | Premium option, develops a natural patina |
Understanding the material your gutters are made from can also affect how you measure, since some materials (like vinyl) come in standardized snap-together sizes, while metal gutters may be custom-formed on site.
Types of Gutter Profiles
Not all gutters look the same, and the shape of your gutter (called its “profile”) affects exactly where you place your tape measure. There are a few common profiles you’ll come across.
K-Style gutters are the most common style found on homes today. They get their name from their cross-section, which resembles the letter K, though most people simply notice that the front face looks like decorative crown molding. K-style gutters have flat bottoms and can hold more water than rounded profiles of the same width, which makes them a practical, high-capacity choice.
Half-Round gutters have a simple curved, U-shaped cross-section, similar to a tube cut in half lengthwise. They’re often found on older or historic homes and have a classic, clean appearance. Because they’re rounded, half-round gutters typically hold slightly less water than a K-style gutter of the same width.
Box gutters are large, square-profile channels usually built into the roof structure itself rather than hanging off the fascia. These are more common on commercial buildings or homes with flat roofs.
Fascia gutters are a specialty style where the gutter is combined with the fascia board itself, creating a seamless, integrated look. These are less common but do appear on some modern builds.
The profile matters because it changes how you interpret your width measurement. A 5-inch K-style gutter and a 5-inch half-round gutter will have different water-holding capacities even though the width number is the same, so always note the shape alongside the size.
Standard Gutter Sizes Explained
Gutters come in a handful of standard widths, and each size is generally matched to a certain type of home or roof.
4-inch gutters are the smallest common option and are typically found on smaller structures like sheds, porches, or bungalows with limited roof area. They’re not usually recommended for a full-sized house.
5-inch gutters are the most widely used size for residential homes. They strike a good balance between water capacity and appearance, and they work well for average-sized homes with standard roof slopes.
6-inch gutters are built for larger homes, steeper roof pitches, or regions with heavy rainfall. Because they’re wider and deeper, they can move significantly more water than a 5-inch gutter, which reduces the risk of overflow during storms.
7-inch and custom sizes exist for commercial buildings, very large roofs, or areas that experience intense downpours regularly. These are less common in residential settings but are sometimes specified by contractors in high-rainfall climates.
Here’s a quick reference table:
| Gutter Size | Best Suited For |
|---|---|
| 4 inch | Small sheds, porches, tiny homes |
| 5 inch | Standard residential homes |
| 6 inch | Larger homes, steep roofs, heavy rain areas |
| 7 inch+ | Commercial buildings, extreme rainfall regions |
Tools You’ll Need
You don’t need a professional toolkit to measure gutters, but having the right basics on hand makes the job faster and safer.
A standard tape measure is the star of the show. A 25-foot retractable tape measure works well for most homes, though you may want a longer one for larger properties. A sturdy ladder is essential, and you should always follow proper ladder safety, keeping three points of contact and having someone spot you if possible. Bring a notepad or your phone to jot down measurements as you go, since it’s easy to forget numbers once you’re back on the ground.
A simple calculator, or the calculator app on your phone, will help when you start adding up linear footage or calculating roof area later. If you want extra precision or you’re working alone, a laser measuring tool can be a helpful upgrade, letting you get accurate readings without holding a tape taut across a long distance.
Step-by-Step: Measuring Gutter Width
Measuring gutter width is the core of learning how to measure gutter size, and it’s simpler than it might sound.
Start by locating the front edge and back edge of the gutter’s top opening. The front edge is the side facing away from the house, and the back edge sits against the fascia board. Once you’ve identified both edges, stretch your tape measure straight across the top opening, from the outer edge of the front lip to the outer edge of the back lip. Read the measurement in inches, since gutter sizes are almost always expressed in whole or half inches (like 5 inch or 6 inch).
A few common mistakes can throw off your reading. Measuring diagonally instead of straight across will give you an inflated number, so make sure your tape is level and perpendicular to the gutter run. Also avoid measuring only the flat bottom of the gutter, since the true “size” refers to the top opening width, not the base. If the gutter has any built-up debris, dirt, or old sealant along the edges, gently clear it away first so it doesn’t distort your reading.
Step-by-Step: Measuring Gutter Depth
Depth is just as important as width because it tells you how much water the gutter channel can actually hold before it overflows.
To measure depth, place your tape measure vertically, starting at the top opening of the gutter and running straight down to the lowest point of the interior channel. Try to keep the tape as vertical as possible, since any lean will slightly overstate the depth.
Depth matters because two gutters with the same width but different depths can handle very different volumes of water. A deeper channel holds more rainfall before it reaches the lip and spills over, which is especially important during sudden downpours or in regions that get intense seasonal storms.
Measuring Downspout Size
Downspouts work hand-in-hand with your gutters, so it’s worth measuring them at the same time.
Standard downspout dimensions are typically either 2 inches by 3 inches or 3 inches by 4 inches, and you’ll measure them the same way you’d measure a small rectangular opening, width across one side and depth across the adjoining side. Some downspouts are round rather than rectangular, in which case you simply measure the diameter straight across the opening.
As a general rule, downspout size should scale with gutter size. A small 2×3 inch downspout paired with a 6-inch gutter may struggle to drain water fast enough during heavy rain, leading to backups. Matching a properly sized downspout to your gutter width keeps the whole system flowing smoothly.
Calculating Total Linear Footage
Once you know the width and depth of your gutters, the next step is figuring out how many total feet of gutter material you’ll need, which matters for ordering supplies or budgeting a replacement project.
Walk the perimeter of your roofline and measure each straight section individually, since roof edges are rarely just one continuous line. Add these individual section lengths together to get your total linear footage.
Don’t forget to account for corners, angled sections, and any offsets where the roofline steps in or out, as these areas often need extra fittings like elbows or corner pieces. It’s also wise to add a small buffer, typically around 5 to 10 percent, to cover any cutting waste or overlap needed where sections join together.
Determining Gutter Size Based on Roof Area
Beyond the physical dimensions, there’s a second layer to how to measure gutter size properly, and that’s sizing for water capacity rather than just appearance.
Start by calculating your roof’s square footage, which you can estimate by measuring the length and width of each roof plane and multiplying them together, then adding the totals for a multi-section roof. Roof pitch matters too, since a steeper roof sheds water faster and sends it into the gutters with more force, requiring extra capacity. Rainfall intensity in your specific region also plays a big role; areas with frequent heavy storms need larger gutters even if the home itself isn’t unusually large.
As a simple general guideline, homes under roughly 1,500 square feet of roof area with a moderate rainfall climate often do fine with 5-inch gutters, while larger homes, steep roofs, or high-rainfall regions typically call for 6-inch gutters or larger. When in doubt, sizing up slightly is usually the safer choice, since an undersized gutter system is far more likely to cause water damage than an oversized one.
Signs Your Current Gutters Are the Wrong Size
Sometimes the clearest way to know your gutters need resizing is simply watching how they behave during a storm. If water pours over the front lip during moderate to heavy rain rather than flowing through the downspouts, that’s a strong sign the gutters are undersized for your roof.
Sagging sections, or gutters visibly pulling away from the fascia board, can indicate the channel is overloaded and holding more water weight than it was designed for. Frequent clogging, even after cleaning, sometimes points to a channel that’s too narrow to handle the volume and debris coming off your roof.
And if you notice water damage, staining, or erosion near your foundation after rainstorms, it’s worth checking whether your gutters and downspouts are simply too small to do their job.
Tips for Accurate Measurement
A few small habits can make a big difference in measurement accuracy. Try to measure gutters on a calm, dry day, since wind can make it hard to hold a tape measure steady, and wet surfaces increase the risk of slipping. It’s always smart to double-check your numbers with a second measurement, especially for width and depth, since a small error can lead to ordering the wrong size material.
For long roof lines, having a helper hold the far end of the tape measure will give you a straighter, more accurate reading than trying to manage it solo. And above all, follow basic ladder and roof safety practices, wear slip-resistant shoes, avoid working during wet or windy conditions, and never lean out further than is safe just to reach an extra measurement.
When to Call a Professional?
While measuring gutters is a manageable DIY task for most homes, there are times when it makes sense to bring in a professional. Complex rooflines with multiple valleys, dormers, or unusual angles can make accurate measurement tricky, and a small error can throw off an entire order.
Multi-story homes present safety challenges that often aren’t worth the risk for a DIY measurement, particularly on steep or high roofs. And if you’re simply unsure about how to translate your measurements into the right capacity calculations, a professional gutter installer can walk the roof, take precise readings, and recommend the right size and system for your specific home.
Frequently Asked Questions (FAQ)
What size gutter do I need for my house? Most standard homes do well with 5-inch gutters, while larger homes, steep roofs, or high-rainfall regions typically benefit from 6-inch gutters. The right choice depends on your roof’s square footage, pitch, and local weather patterns.
Can I mix gutter sizes on one house? Yes, it’s fairly common to use a larger gutter size on sections of the roof that collect more water, such as areas beneath steep valleys, while keeping standard sizing elsewhere.
How often should gutters be resized or replaced? There’s no fixed schedule, but if you’re experiencing frequent overflow, sagging, or damage despite regular cleaning, it may be time to reassess whether your current size still matches your home’s needs.
Does gutter size affect cost? Yes, larger gutters generally cost more per linear foot due to the extra material involved, and they may also require sturdier hangers and brackets to support the additional weight of water.
Conclusion
Learning how to measure gutter size doesn’t have to be intimidating. With a tape measure, a sturdy ladder, and a little patience, you can accurately capture the width, depth, downspout dimensions, and total linear footage you need for your project. Pairing those measurements with a look at your roof’s size, pitch, and local rainfall patterns ensures you end up with a system that’s not just the right shape, but genuinely capable of handling what your climate throws at it.
As the old carpentry wisdom goes, measure twice and install once. Taking the time to get your numbers right upfront will save you from costly mistakes, mismatched parts, and future water damage. If your roofline is complex or you’re not fully confident in your measurements, don’t hesitate to bring in a professional gutter installer to double-check before you buy materials or start the job.
Related Articles
What Is a Composition Roof? A Complete Homeowner’s Guide
Why Is My Basement Flooding: Complete guide 2026
Do Flat Sloped Roofs Perform Better Than a Gable Roof? Full Guide