Cracks in garage floor surfaces are one of the most common concerns homeowners face, yet most people either ignore them or panic unnecessarily. The truth sits somewhere in the middle. Not every crack signals a structural disaster, but not every crack should be dismissed either.
Understanding what type of crack you are dealing with, why it appeared, and what the right fix looks like can save you thousands of dollars in unnecessary repairs or prevent a small problem from turning into a major one.
Types of Cracks in Garage Floor
When you spot cracks in your garage floor, the first step is identifying what kind they are. Different crack patterns point to different causes and require different solutions.
Hairline Cracks
Hairline cracks are the thinnest and most common type, usually appearing within the first year after a new concrete pour.
They form as the concrete cures and shrinks slightly during the drying process. These cracks are typically less than 1/16 of an inch wide and run in fairly straight lines.
While they look alarming at first glance, they rarely affect the structural performance of the slab and are mostly a cosmetic concern.
Structural Cracks
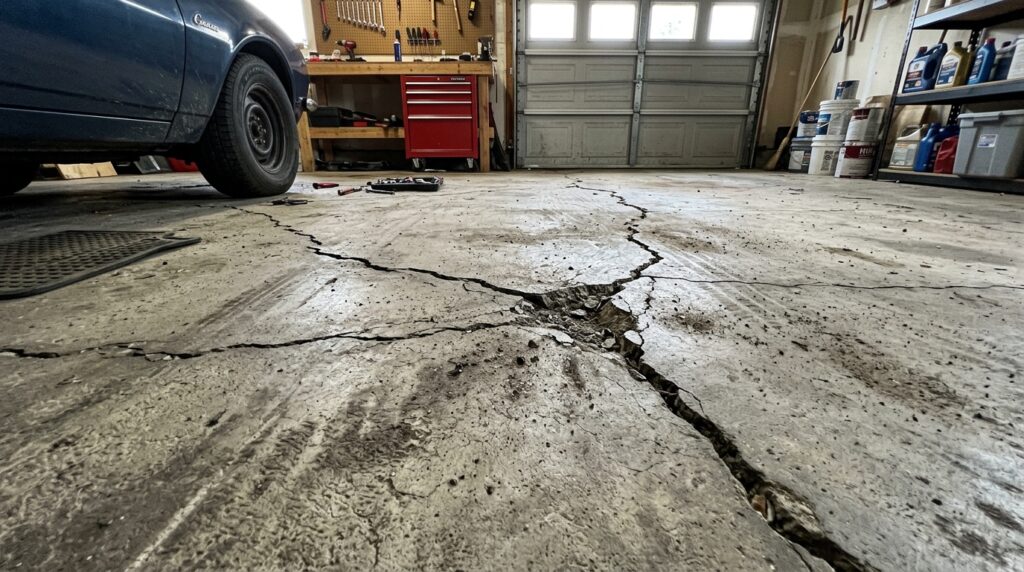
Structural cracks are wider, deeper, and often uneven on both sides of the crack. If one side of the crack sits higher than the other, that is called a displacement crack, and it indicates serious ground movement beneath the slab.
These cracks demand professional attention because they signal that the concrete foundation itself is under stress.
Settlement Cracks
Settlement cracks occur when the soil beneath the garage floor compresses or shifts unevenly. Over time, the slab loses support in certain areas and begins to sink or separate.
These cracks often run diagonally and can be accompanied by a noticeable dip or unevenness in the floor surface.
| Crack Type | Width | Risk Level | Action Required |
| Hairline | Under 1/16″ | Low | Monitor or seal |
| Shrinkage | 1/16″ – 1/4″ | Low to Medium | Fill and seal |
| Settlement | 1/4″ or wider | High | Professional repair |
| Structural/Displacement | Varies | Very High | Engineer assessment |
Common Causes of Cracks in Garage Floor
Knowing why cracks in your garage floor appear helps you prevent them from coming back after repair. Several factors contribute to concrete cracking, and often it is a combination of more than one.
Concrete naturally shrinks as it dries and cures. When the mix contains too much water, the shrinkage is greater, and the resulting cracks are more widespread. Poor curing practices, such as allowing the surface to dry too quickly in hot or windy weather, also increase the likelihood of cracking.
Soil movement is another major cause. Expansive clay soils absorb moisture and swell, pushing against the slab from below. In dry conditions, that same clay shrinks and pulls away, leaving the concrete unsupported. Tree roots growing underneath the slab can create similar pressure points. In colder climates, the freeze-thaw cycle is a constant enemy of concrete. Water seeps into tiny pores, freezes and expands, then thaws and contracts, gradually widening any existing crack.
Heavy loads are also a factor many homeowners overlook. A residential garage floor is typically designed for standard vehicle weights. Parking heavy trucks, RVs, or storing industrial equipment consistently on the same area can cause stress fractures over time.
How to Assess Cracks in Garage Floor Before Repairs
Before reaching for a repair product, spend a few minutes properly assessing the crack. This step is often skipped, but it saves effort and money.
Start by cleaning the crack area and measuring its width using a coin or ruler. Note whether the crack is active or dormant. An active crack continues to change in size or direction, while a dormant crack has stabilized. If you place a small piece of tape across the crack and it tears or moves over a few weeks, the crack is still active and needs the underlying cause addressed first.
Check for vertical displacement by running your hand across the crack. If one side is higher than the other, even slightly, that is a red flag. Look for moisture seeping through the crack after rain. Water intrusion accelerates deterioration and can lead to mold growth beneath any floor covering.
DIY Repair Methods for Cracks in Garage Floor
For hairline and smaller shrinkage cracks that are stable and dry, several effective DIY options exist.
Polyurethane or Epoxy Injection is widely considered the gold standard for filling cracks from within. Epoxy injections bond the concrete back together and restore much of the original strength. Polyurethane foam expands to fill the crack and remains slightly flexible, making it ideal for areas with minor ongoing movement.
Concrete Caulk or Crack Filler works well for surface-level cracks. Clean the crack thoroughly, remove any loose debris with a wire brush, and apply the caulk in a continuous bead. Smooth it flat with a putty knife and allow it to cure fully before driving over it.
Resurfacer Products are a good option when cracks are accompanied by surface spalling or general surface deterioration. A concrete resurfacer bonds to the existing slab and provides a fresh, uniform surface. It covers minor cracks but does not address any structural issues underneath.
Step-by-step summary for a basic DIY crack repair:
- Clean the crack with a wire brush and vacuum out all debris.
- Widen very narrow cracks slightly with a cold chisel to allow better filler penetration.
- Apply a concrete bonding adhesive if using a patching compound.
- Fill the crack with the appropriate filler material.
- Smooth the surface and allow full curing time as per product instructions.
- Seal the entire garage floor to prevent future water intrusion.
When to Call a Professional for Garage Floor Cracks
While many cracks in a garage floor are manageable as DIY projects, certain situations clearly call for a professional structural engineer or foundation specialist.
If the crack is wider than half an inch, if there is significant vertical displacement, or if you notice that doors or windows in the garage structure no longer open and close properly, these are signs that the problem may extend beyond the floor slab itself.
Foundation settlement affecting the garage can sometimes indicate broader structural movement in the main structure of the house as well.
Water that continuously seeps through a crack, especially after every rainfall, indicates hydrostatic pressure beneath the slab. This requires proper waterproofing and drainage solutions, not just surface patching. Similarly, if a repaired crack reopens within a short period, the root cause has not been addressed, and a professional assessment is necessary.
How to Prevent Cracks in Garage Floor
Prevention is significantly cheaper than repair. Many homeowners could avoid cracks in their garage floor with a few simple practices during construction and maintenance.
During new construction, insist on proper site preparation. The subbase should be well-compacted and ideally include a layer of gravel for drainage.
Control joints should be cut into the slab at regular intervals to give the concrete a designated place to crack rather than cracking randomly. The water-to-cement ratio in the mix should be kept low to reduce shrinkage.
For existing floors, sealing the concrete every two to three years creates a barrier against water infiltration and freeze-thaw damage.
Keeping gutters and downspouts clear so that rainwater is directed away from the garage foundation reduces the moisture load on the soil beneath the slab. Avoid parking extremely heavy vehicles in the same spot repeatedly, and consider using rubber mats or anti-fatigue mats in high-traffic areas to distribute load more evenly.
FAQs About Cracks in Garage Floor
Are cracks in a garage floor normal?
Yes, hairline and shrinkage cracks are very common and considered normal in concrete slabs. They do not automatically indicate a structural problem and can usually be sealed as a straightforward maintenance task.
How do I know if a garage floor crack is serious?
A crack is serious if it is wider than a quarter inch, if one side is higher than the other, or if it is growing over time. Cracks paired with water seepage or uneven floor surfaces also need professional attention.
Can I seal cracks in my garage floor myself?
For small, stable, dry cracks, yes. Products like polyurethane caulk, epoxy filler, and concrete crack sealers are available at any hardware store and work well for minor repairs when applied correctly.
How much does it cost to repair garage floor cracks professionally?
Minor crack repairs typically range from $200 to $500. More involved repairs involving mudjacking, slab lifting, or underpinning for settlement issues can range from $1,000 to $5,000 or more depending on the extent of damage.
Does homeowners insurance cover garage floor cracks?
Generally, no. Standard homeowners insurance covers sudden and accidental damage but excludes gradual deterioration, settling, or maintenance-related issues. Coverage varies, so always check your specific policy.
Conclusion
Cracks in garage floor concrete are a reality for most homeowners at some point. The key is not to panic at the sight of every crack, but to assess each one thoughtfully.
Hairline and surface cracks are normal and manageable with the right product and a bit of weekend effort. Wider, displacing, or water-leaking cracks deserve prompt professional evaluation before they develop into costlier structural problems.
Regular sealing, proper drainage, and awareness of load limits go a long way in extending the life of your garage floor and keeping it crack-free for years to come.
Related Articles
Metal Roof Overhang: A Complete Guide to Designing Effective Overhangs
Window with J-Channel: A Complete Homeowner’s Guide
Can You Paint Vinyl Cladding? Prep and Paint Like a Pro
How to Clean Faux Suede Furniture Without Ruining It?
Dual Ceiling Fan Guide: Everything You Need to Know Before Buying